


Helpful Hints
A collection of tips and tricks to help you with your entries.
Presentation
By: Eric Scheur
Published September 8th, 2008
Hey Howdy Hey, everybody! Today's installment of Helpful Hints will be split into two topics, both of which fall under the heading of "How to encourage better comments and critiques." You see, aside from the actual animation, a lot of the help you receive or don't receive can be based on the way you present your work in progress.
PART 1 - VISUAL NOISE
The first topic we're going to talk about is Visual Noise. Before we settle in, however, I'd like to share this video with you:
There. I hope you've all learned an important lesson about driving and bike safety.
But the video also illustrates a point that's very relevant to posting your work in the 11 Second Club forums: If there's a lot of stuff going on in the frame, it's really really hard for people to see what you want them to look at. The most common example of this offense is Animation Controllers. Those circles, squares, loops, lines, whizbangs, and charliebobs that allow you to manipulate your character. They're incredibly convenient for selecting the precise joint you need to rotate, but when it comes to showing off your preview renders, they often do more harm than good.
Have a look at this work in progress:
Whoa! There's an awful lot of visual information going on there! If I squint, then maybe I can get a rough idea of what this character is doing, but I'm certainly not going to be able to notice any of the details. And when it comes to critiquing animation, details are often the place that draw the most comments. Whether it's an elbow pop, or a bit of the lipsync that feels too late, or a hand gesture being off of its arc, you're going to need as clear a view as you can get--and this video just ain't clear, folks.
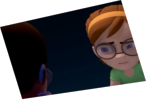
As a contrast, have a look at this video:
Aaahhh! So that's what the character was actually doing! With all of that clutter out of the way, I can definitely get a better sense of what I'm supposed to be looking at. And as a matter of fact... yes! I see something that I would definitely want to alert this animator to. There's a pop in the eyebrows that I didn't notice when all of the animation controls were on. I'll definitely want to make sure I mention this when I respond to this video in the Work In Progress forum. I would say something like this:
Hey there! I think that this piece is really coming along. I enjoy what you're doing when he says "fly," and how excited he gets when he's talking about the birds coming back, too. There is one spot, however, that I noticed a little bit of jitter. The end seems like it's jumping around a little, like it's not quite smooth. And there's an eyebrow pop when he says "It's dead exciting." It's kind of, like... it's during the word "exciting"... but not... well, it's in the middle of the word, but a little later than....hm....."
Okay, so that critique began to fall apart near the end there, because I couldn't describe exactly where I saw the eyebrow popping. Which brings me to the second part of this article.
PART 2 - FRAMECOUNTERS
Animation is a frame-by-frame art form. It's important to have control over each and every frame that's in your animation. And when you're critiquing someone's work, it can be invaluable to be able to be able to refer the animator to a specific frame or range of frames in their animation. Instead of trying to talk in a roundabout way, vaguely referring to an area of someone's piece by mentioning a bit of the dialogue near the frame in question, or a gesture that occurs slightly after the note you're trying to address, imagine if the previous video had actually been posted like this:
Hey hey hey! Now I can happily frame back and forth through this animation, and get down and dirty with my critiques. With the addition of a framecounter, I can now post a response something a little more like this:
Hi again. Thanks for including a framecounter this time--that's a huge help! Okay, so that eyebrow pop I was talking about is happening between frames 142 and 143. See how the eyebrows come right back down on frame 144? I think you might get a little bit of a more appealing motion if you hold those eyebrows up for 3 or 4 frames, and then ease into bringing them back down to their normal resting spot by frame 150 or so. (and remember to ease back into the resting position for a frame or two, so it won't feel like an abrupt stop). Also, now that I can see the exact frame numbers, I can tell you that the spacing on the body between frame 134 and 135 seems a bit big--not that you can't get away with that, but you drop down so quickly on frame 137, without easing into the top of the move at all, it feels a bit like a pop....
See how much easier it is to critique once we can identify specific frames by their exact numbers? And I'll tell you a secret: for me, it's a lot more fun, too!
Now, I know what you're saying "But Eric, my software doesn't have a frame counter, and I don't have access to any kind of fancy editing packages." Well, fear not. First of all, most major animation packages allow you to include a framecounter when you save a playblast or a preview render. Look in your software's help file to find out how to access it.
As another option, you can use Quicktime Pro to help you add in a frame counter in a few relatively simple steps. Here's how:
PART 2 and a Half - LET US SEE YOUR FRAMES
As a final note, I know that many of our forum users make use of free video sites like YouTube and Vimeo, which don't easily allow users to frame back and forth through animation. I understand that these sites offer free video hosting, as opposed to the monthly and yearly fees you might have to pay for your own webspace. Still, I would strongly encourage any animator who is seriously looking to improve their work to look into the option of a web host that can store their Quicktime files for use in the forums. It can do wonders for what kinds of critiques your peers will be able to offer.
The bottom line is this: if you want good, solid critiques, you need to give your critiquers every visual advantage to help you out. It's not enough to render out a rough preview in low resolution, with the animation controls turned on, no frame counter, and a prop not quite correctly constrained to the character's hand (but which you intend to fix later), and expect a forum member to spend their time sifting through the visual noise trying to give good advice.
Most of us have it within us to critique our own work to a point. In fact, one of the most important skills an animator can develop is being able to look at their own work fresh, as if it were someone else's. We know the little bits of movement we still need to smooth out, and we know when our uploads might not be as clear as they could be if we had just taken an extra five minutes of our time to put together a clean presentation. Believe me, it is absolutely worth those five minutes of prep-time when it comes to showing your work to a group of friends, co-workers, or strangers.
Even if you're the most beginningest animator on the site, you're almost certain to get a positive response if you respect your peers' time and do your best to give them something to work with. If you have any questions, you can always get in touch by posting in the Helpful Hints thread in the 11 Second Club forums.
Until next time, good luck and happy animating! - Eric
comments powered by Disqus