

Helpful Hints
A collection of tips and tricks to help you with your entries.
Back and Forth
By: Eric Scheur
Published January 18th, 2009
I'd like to talk about an animation technique I learned several years ago. When I look back at trying to figure out how to control my animation on the computer, I can see a definite dividing point: before I learned how to do this my animation was loose and sloppy; after I learned how to do this my animation got much tighter and easier to work with.I use this technique every day. I use this technique on every shot I do. I use this technique at every stage of animation, from blocking all the way through to final polish. I don't know how I ever lived without it.
And today I am going to share it with you. This amazing, oh-so-simple but oh-so-powerful technique is a little something I like to call Back and Forth.
Here's how it works:
When you pose your characters, you need to make sure that each pose moves naturally into the next. Every body part should be affected even if it's just a little bit, because our bodies move as a single unit (as opposed to each body part being a single unit). If even the slightest move doesn't feel natural, your audience will pick up on that and your animation will feel less true.
You need a method of checking how your poses move between each other. The way to do this is to rely on your "next key" and "previous key" buttons. (note: in most 3d software these are the < and > keys on your keyboard--they almost look like little arrows pointing forward and backward, don't they?)
Once you've set up your first two poses, use those "next key" and "previous key" buttons to check them out. First look at the first pose, then the next pose. Then the first pose and then the next pose. Look for how the pose changes from one shape into another. Look at how the hand moves. Watch how the fingers drag, and the shoulder drops. See how the head angle changes, and how the curve of the spine reverses. The first pose and then the next pose. The first pose and then the next pose. Do this over and over and over and over. Back and forth. Back and forth. Back and forth. Back and forth.
This is essentially what 2d artists are doing when you see them roll their drawings between their fingers: they are watching how their poses move from one to the next. Stop motion animators do it with the help of video frame-grabbers. Us computer animators? We have the "next key" and "previous key" buttons.
Let's check out a simple example of what I'm talking about.
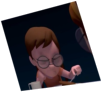
This is a shot from The Incredibles, during the scene where Mr. Huff is threatening to fire Bob. This is how the scene plays out in real time:
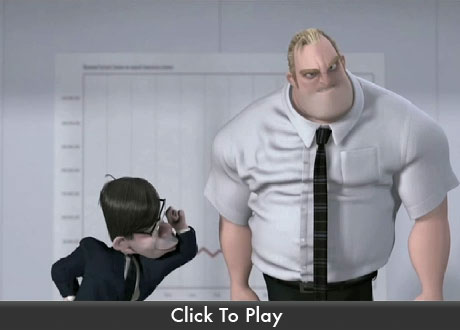
There are some great things going on with Huff, and I encourage you to frame through his motion. But for this example, we're going to focus on Bob.
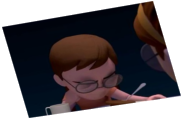
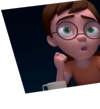
You can see that Bob pretty much has two poses:
- • Fuming with both arms at his side
- • Fuming with one arm extended outward, holding Huff by the neck

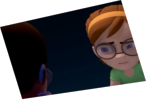
We can see that when Bob's arm goes up, his shoulder goes up, too. But that's just the start. Look at the other changes:
- • The hips shift towards screen left just a little bit. Even though it's a small change, it sells the idea of the body's inertia.
- • The screen right shoulder also moves up quite a bit.
- • The screen right arm pulls in closer to the body.
- • The screen right hand clenches into a tighter fist and rotates up towards the body.
- • The head changes its angle slightly: rotating in the direction of the pose, and tilting downwards.
- • The face clenches tighter and the eyes pinch shut.
You can use this back and forth method to check out how each part of your character moves from one key to the next, and if you see places that could be improved (this elbow should move back more, the foot should roll up higher, etc.), you can make those little adjustments where you need to and then check them again using back and forth, back and forth, back and forth.
This is what people mean when they say they are "checking out how two frames animate"--they're watching all of the differences between the two keys, large and small, to make sure that the movement makes sense.
Once you've gotten into the habit of checking how two poses work together, you can start to get more advanced by moving back and forth between several poses in a row. It works like this:
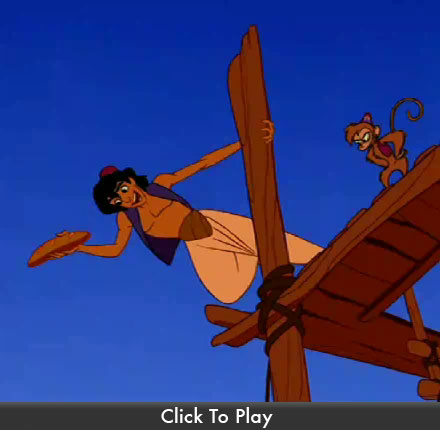
This shot is from Aladdin, during the song "One Jump Ahead." Just like before, let's start by watching the clip in real time:
Got it? Good.
Once again, it looks like there are only two major poses here:
- • Leaning out from the post
- • Hiding behind the post

Clearly, these two keys have much bigger spacing than the first clip we watched from The Incredibles. If you were animating this scene, you might be satisfied with these two poses, confident that they're selling the ideas that you want to get across to the audience. So, where do you move from there? You put in breakdowns. Back and Forth can help you with your breakdowns as well.
Here are the breakdowns that are in the scene:
Note: I don't know for certain which are the exact keys and breakdowns the animator chose. I'm making my best educated guess.

Watch each detail, every single body part. You can see how nicely the drawings work with each other. Everything is moving on good arcs, each body part feels natural even though the movement is exaggerated beyond what an actual human can do.
But we're looking at this after the fact. If you were animating this scene, you'd have to do a lot of Back and Forth checking to make sure that each of your breakdowns are working properly. So for the first set of breakdowns, you might find yourself looking at your keys something like this:

You'd go back and forth, over and over, forwards and backwards, over and over, just to make sure everything is working with each other. These are just the first keys and breakdowns:
- • Frame 1 - Leaning out from the post
- • Frame 32 - Leaning out further (to accentuate the song lyric)
- • Frame 49 - Pulling backwards to escape the flying swords and spears

Over and over, back and forth, forwards and backwards. Over and over. From one key to the next, over and over, forwards and backwards, Back and Forth.
If I'm coming across as repetitive, that's part of the point. My "next key" and "previous key" buttons are some of the most used keys on my keyboard and this is why. It's the best way I know to check how my frames keys are working before I put in my breakdowns.
And then, once my breakdowns are in there, I can check how they are working before I put in my inbetweens.
Back and Forth is all about keeping iron-clad control over your animation, and not letting the computer put in any movement that you don't want to be in your shot.
Good luck, and happy animating! :)
- Eric
Discuss this article in the forums
comments powered by Disqus